Intelligent Temperature Controller with Precise Control and User-Friendly Operation
Controller Usage Instructions:
- Setup and Operation:
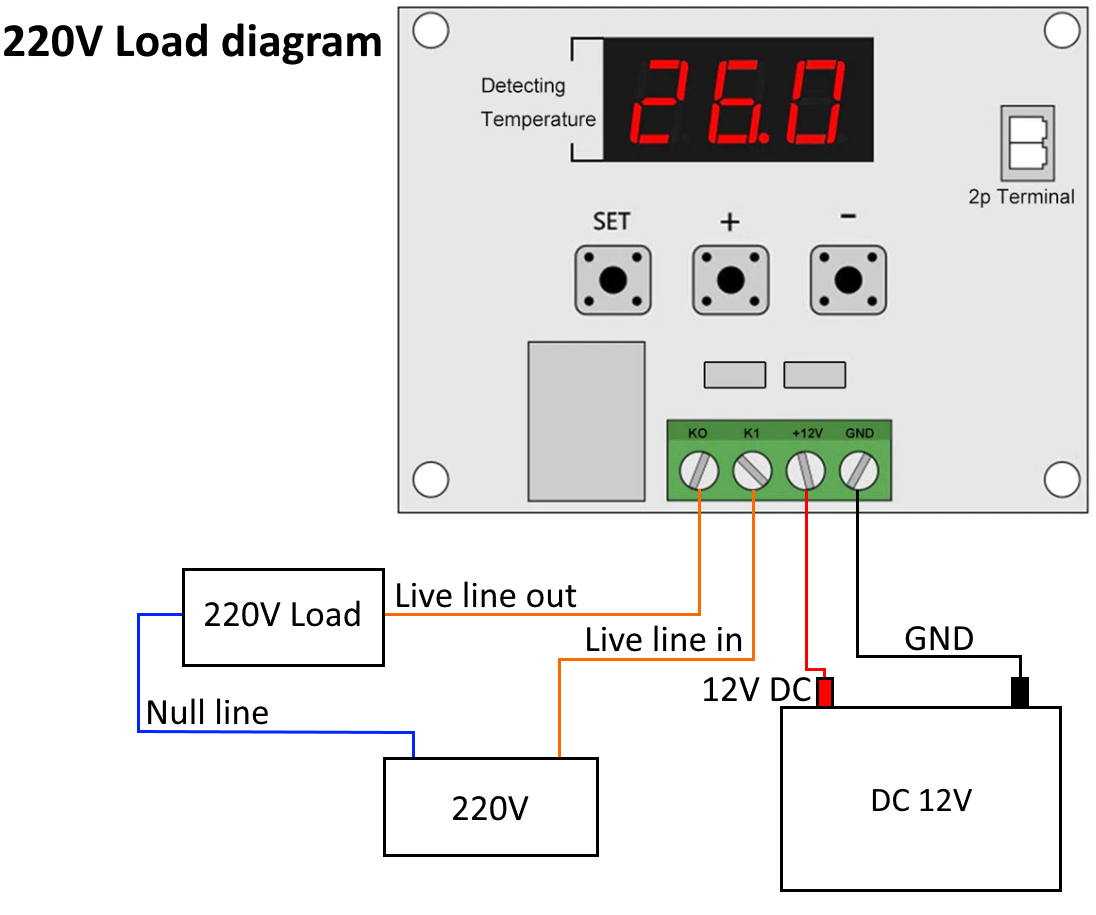
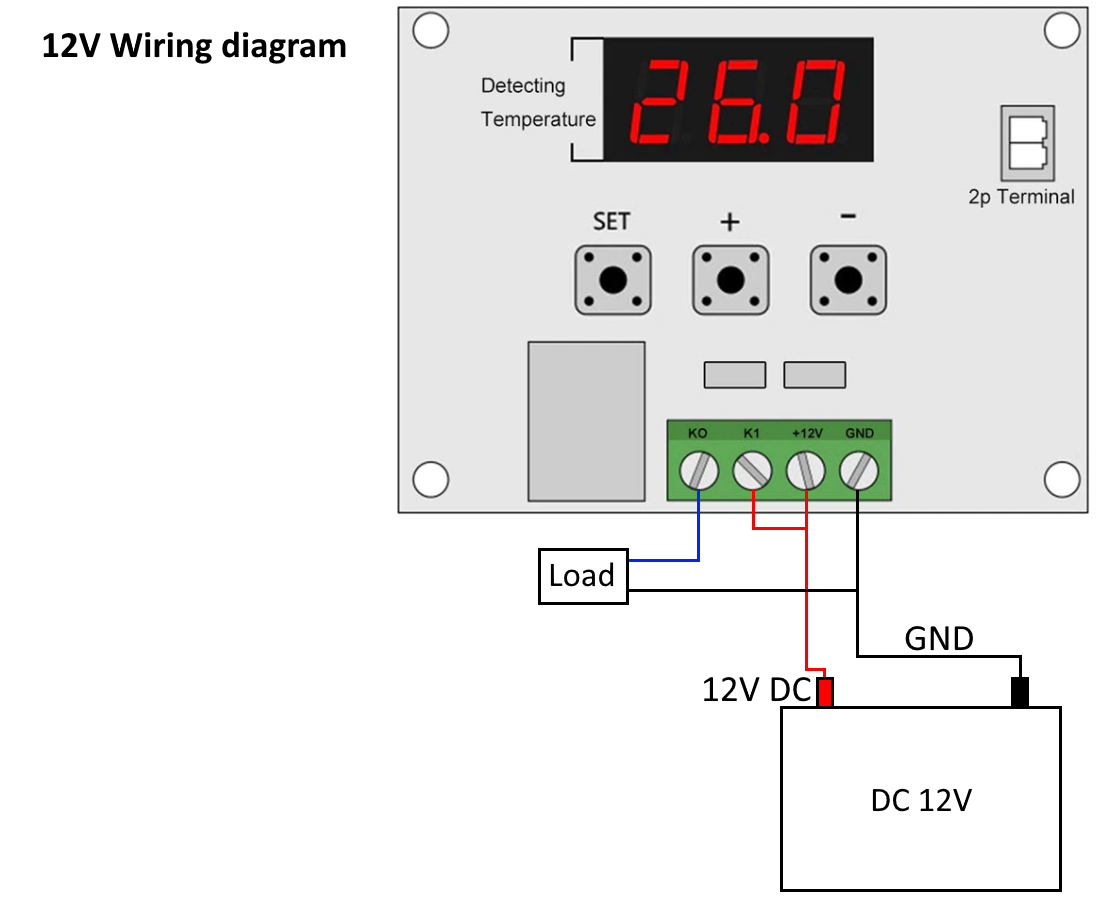
- Connect the power supply and equipment to the controller.
- Press the SET button, and the displayed temperature will start flashing.
- Press the "+" or "-" buttons to set the desired temperature (hold down the button for 5 seconds to adjust quickly).
- Press SET to confirm the set temperature and exit. The controller will automatically execute the relay action based on the set temperature.
- Indicator and LED Status:
- Indicator: Indicates whether the relay is closed or open. Off means the relay is disconnected.
- Digital Display: Shows sensor status and alerts:
- "888": Sensor is open; follow instructions to connect the sensor.
- "HHH": Exceeds the maximum temperature range; relay is forcibly disconnected.
- "LLL": Below the lowest temperature range; relay is forcibly disconnected.
- "---": High-temperature alarm; relay is forcibly disconnected.
- Parameter Functions:
- Press and hold the SET button for 5 seconds to enter the main menu settings.
- Press the "+" or "-" buttons to switch between P0-P8.
- Long press SET or 10 seconds without button operation to confirm settings or automatically return.
Detailed Parameter Functions:
P0: Refrigeration and Heating Mode:
- In the P0 menu, press SET to enter setup.
- Press the "+" or "-" buttons to switch between heating mode [H] and cooling mode [C].
- Press SET to confirm and return.
- Long press SET or 10 seconds without button operation to automatically confirm the setting.
P1: Hysteresis Setting:
- In the P1 menu, press SET to enter hysteresis setup.
- Press the "+" or "-" buttons to set the hysteresis value between 0.1 and 30.
- Press SET to confirm and return.
- Long press SET or 10 seconds without button operation to automatically confirm the setting.
P2: Highest Temperature Setting Limit:
- In the P2 menu, press SET to enter setup.
- Press the "+" or "-" buttons to set the maximum temperature limit (up to 110°C).
- Press SET to confirm and return.
- Long press SET or 10 seconds without button operation to automatically confirm the setting.
P3: Minimum Temperature Limit:
- In the P3 menu, press SET to enter setup.
- Press the "+" or "-" buttons to set the minimum temperature limit (down to -50°C).
- Press SET to confirm and return.
- Long press SET or 10 seconds without button operation to automatically confirm the setting.
P4: Temperature Correction:
- In the P4 menu, press SET to enter setup.
- Press the "+" or "-" buttons to set the correction value within the range of -7.0 to 7.0 (unit: °C).
- Press SET to confirm and return.
- Long press SET or 10 seconds without button operation to automatically confirm the setting.
P5: Delay Start Time (unit: seconds):
- In the P5 menu, press SET to enter setup.
- Press the "+" or "-" buttons to set the delay start time (range: 0-600 seconds).
- Press SET to confirm and return.
- Long press SET or 10 seconds without button operation to automatically confirm the setting.
P6: Buzzer Switch (currently not functional).
P7: Temperature Alarm Function:
- In the P7 menu, press SET to enter setup.
- Press the "+" or "-" buttons to set the high temperature alarm threshold (range: 0-110°C) or select "OFF" to turn off the feature (default: 50°C).
- Press SET to confirm and return.
- Long press SET or 10 seconds without button operation to automatically confirm the setting.
P8: Restore Factory